Now I'm going to take a closer look at the device.
The first thing that immediately springs to notice is that it's really small.
There appears to be nothing to it.
there is a series of pins sticking up labelled P1, these are the GPIO pins, There is a yellow composite video connector next to this, then a 1/8" jack socket, then you see a stack of 2 USB sockets, then a network port.
moving round another corner there is an HDMI socket, in the final corner of the board is a micro USB socket that's where the power for the device is provided.
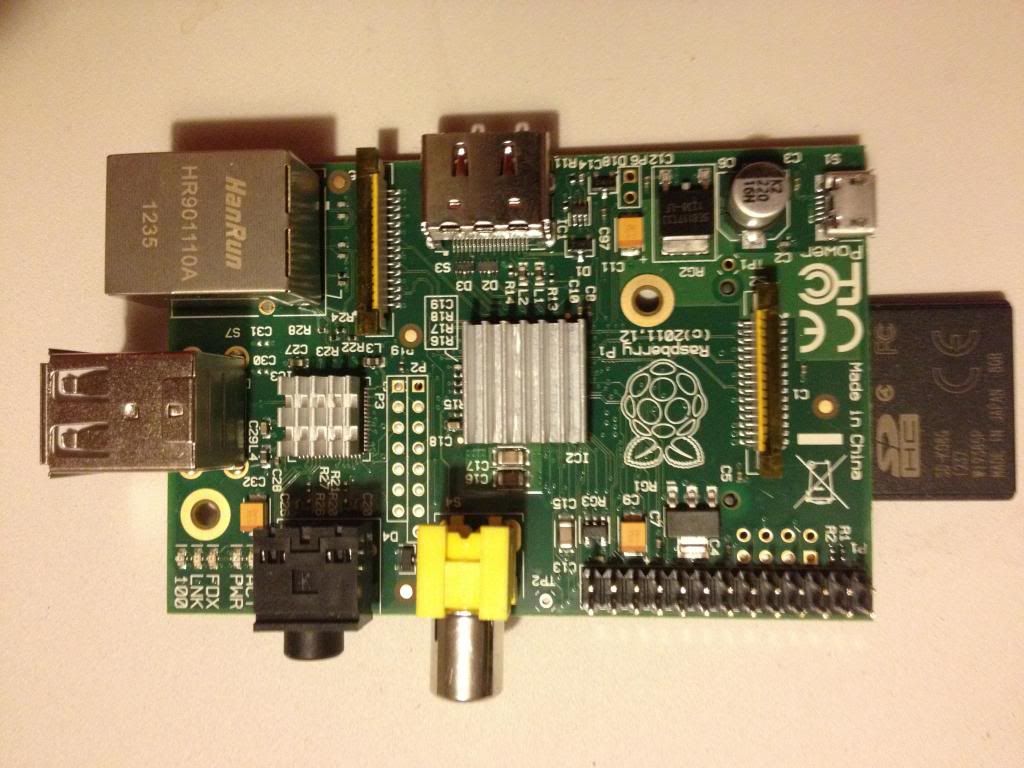
Flipping the board over and looking at the back shows you where the SD card socket is:

The first picture of the front of the board shows that I've already started attaching small aluminium heat sinks to the device.
So, the Raspberry pi comes literally as a board.
to actually use this you;re going to need:
A USB keyboard (at least for the first time you turn it on)
A USB mouse, (you can forget this if you never use a mouse)
A power supply (a 2A 5v supply with a USB micro socket, (perhaps an IPad supply is a good idea!)
A video lead, either HDMI or a yellow RCA lead, (and possible an RCA - Scart adapter if your TV does not have RCA inputs.
Probably a network cable, or a wireless adapter, (but only if you want to go on-line or have connectivity from any other device in your house etc.)
When you've got your Blank SD card you're going to need to figure out how to write to it.
Assuming that you're using windows, you need to down lad the win32Diskimager program.
insert the SD card into an SD reader.
download an image or the current supported distribution from the raspberry pi foundations website.
Write the image to the card, pop it into the SD slot on the Raspberry pi.
plug the Pi into the TV, switch it all on...
The first screen that you're faced with is a screen for customising the Raspberry pi, and overclock options.
I highly recommend to just quit this now.
Use the device for a bit first, and then figure out what you need to change.
When you've exited from this configuration thing you're going to be left at a text prompt.
the user name that you need to login with is pi.
the default password is raspberry.
Given that everyone now knows your password the first thing that you should do is type:
passwd
to set a new password!
Now you're going to be looking at a text screen, this is how I prefer to work with Linux, since I don't use it as a desktop OS.
There are a few commands that you can type now.
pi@raspberrypi ~ $ cat /proc/cpuinfo
Processor : ARMv6-compatible processor rev 7 (v6l)
BogoMIPS : 697.95
Features : swp half thumb fastmult vfp edsp java tls
CPU implementer : 0x41
CPU architecture: 7
CPU variant : 0x0
CPU part : 0xb76
CPU revision : 7
Hardware : BCM2708
Revision : 000f
Serial : 00000000e80c5a57
The first thing that you should take a look at is what board you have. (and where it was made)
the revision describes what model of Raspberry pi you have:
'0002' => 'Model B Revision 1.0',
'0003' => 'Model B Revision 1.0 + Fuses mod and D14 removed',
'0004' => 'Model B Revision 2.0 256MB', (Sony)
'0005' => 'Model B Revision 2.0 256MB', (Qisda)
'0006' => 'Model B Revision 2.0 256MB', (Egoman)
'0007' => 'Model A Revision 2.0 256MB', (Egoman)
'0008' => 'Model A Revision 2.0 256MB', (Sony)
'0009' => 'Model A Revision 2.0 256MB', (Qisda)
'000d' => 'Model B Revision 2.0 512MB', (Egoman)
'000e' => 'Model B Revision 2.0 512MB', (Sony)
'000f' => 'Model B Revision 2.0 512MB', (Qisda)
Mine was made by Qisda, in china, exactly like the Made in china label says.
you can also have a look at the firmware version by using the vcgencmd utility
vcgencmd version
Oct 25 2012 16:37:21
Copyright (c) 2012 Broadcom
version 346337 (release)
or we can use the uname command:
uname -a
Linux raspberrypi 3.2.27+ #250 PREEMPT Thu Oct 18 19:03:02 BST 2012 armv6l GNU/Linux
Next we want to be able to know a few more things about the Raspberry pi.
By default this thing comes without any heat sink. just bare chips soldered to a board.
we can see the temperature of the main processor by using another vcgencmd command
vcgencmd measure_temp
temp=44.4'C
There are a few other commands that can be used with this utility, have a look here
http://www.elinux.org/RPI_vcgencmd_usage
Having gotten our firmware version (346337)
we might want to upgrade our firmware,
To do this I assume that you have a working internet connection.
(when I say working I found that the name resolution was a bit buggy so had to add DNS servers to /etc/resolve.conf (I added nameserver 8.8.8.8 and 8.8.4.4)
so we want to use the command:
sudo apt-get update && sudo apt-get install raspi-config libraspberrypi* That's 3 commands really, the first is :
sudo That means do a super user command, (regular users can't run stuff that can break things)
then you say apt-get (which launches a program that can go find and install software for you).
then we say update this means update the list of stuff that can be installed.
then we are telling the program manager to install some stuff.
(I'll come back to this command in a later tutorial I'm sure, or you can go search for it's usage!)
This command updates the firmware.
after it's finished you'll be returned to the login prompt and should type
sudo reboot
(that restarts the device)
Now when you type
vcgencmd version you find that it returns
Feb 7 2013 16:46:17
Copyright (c) 2012 Broadcom
version 367974 (release)
Lastly the command you want to use to upgrade the kernel is
sudo apt-get dist-upgrade
now when I type
uname -a I get a different software version
Linux raspberrypi 3.6.11+ #371 PREEMPT Thu Feb 7 16:31:35 GMT 2013 armv6l GNU/Linux
1 comment:
Erm....you lost me after the password change! I suspect you are a lot less of a beginner than I am! Ah well.
Post a Comment