You don't have to take the guitar apart, you can build a completely separate box with two jack sockets a capacitor and a variable resistor that sits in the middle like a foot pedal so that you can play with the values that you'd like to use.
Frequency pitch and music
This isn't really a lesson about what makes up sound waves, but if you have the ability to play with a wave shaping synth program I heartily recommend it, I don't have any specific recommendations, but ideally you're looking for something that you can see the wave form of, as this will help you visualise what you're doing to the actual signal as you pass through the different parts of the circuit.
The Sine wave is the simplest wave it sweeps up and down in a smooth motion, the sound of this is a perfect whistle.
If you increase the frequency of the note, then you increase the pitch of the note.
for example if you have one note at a set certain frequency, if you double this frequency, then the note appears to be one octave higher than the preceding note.
Higher frequency = Higher pitched sounds.
Now music, isn't (or at least usually isn't) made of perfect sine waves. when you pluck a guitar string for example you get the first wave at the main frequency, but then there are other frequencies that appear in the wave, these are called fundamentals.
For example,
If we take a 3v 500Hz wave form (purple), and add to that a 2v 1KHz waveform (red), and add to that a 1v 2KHz waveform (blue), we end up with a wave that looks like this (black.)

In this case 500Hz is our core frequency, and the 1K and 2K waveforms are the fundamentals.
Capacitance and Reactance
Aside from the Power storage, and DC blocking capabilities of capacitors discussed in previous posts (the capacitor and the transistor amplifier).
Another property of capacitors is that they have a reactance.
Reactance is in the most basic terms the resistance of the capacitor to AC waveforms.
If you have a different value of capacitor, you have a different level of reactance to a specific frequency. Also with the same value of capacitor but a different frequency you get a different reactance.
Reactance is determined by the equation
Xc = 1/(2 * pi * F * C)
So, lets say that you have a 1uF capacitor, and a 500Hz frequency.
Xc = 1/(2 * pi * 500 * 0.000001)
Xc = 1/0.00314) = 318Ohms
Now lets say that you have the same 1uF capacitor, and a 1KHz frequency (our first fundamental)
Xc = 1/(2 * pi * 1000 * 0.000001)
Xc = 1/0.00628) = 159Ohms
Now lets work the same cap but with the 2KHz frequency
Xc = 1/(2 * pi * 2000 * 0.000001)
Xc = 1/0.0125) = 80Ohms
The Tone control (Treble cut)
Earlier I talked about how a musical note wasn't just one frequency, it was a main frequency with other fundamental frequencies imposed on it.
The simplest type of tone control is the treble cut control.
Basically, knowing that a capacitor will have a different reactance to different frequencies we can design a circuit that will have the properties of providing an easy path to ground for the higher frequencies (where the reactance is lower), and yet still allow the lower frequencies (where the reactance is higher) to continue un-grounded to the load (in the case of a guitar then load is an amplifier).
So what we want to do is take our waveform that's made up of three frequencies, and decide how we want to change it.
Since this is a treble cut, we'll assume that we've decided that the note sounds too "bright" and so we want to remove some of the higher frequencies and make the note sound a little less bright, a bit deeper, more jazz like.
We want to try to lessen that 2000Hz signal that's in that waveform.
Above I used an example 1uF capacitor and looked at the waveforms that appear across three octaves (remember double the frequency add one to the octave) and we got the following values of reactance.
500Hz, Xc = 318Ohms
1KHz, Xc = 159Ohms
2KHz, Xc = 80Ohms
So if we took that original signal, we're providing a really easy path to ground for 2KHz signals.
and a fairly, but not quite as easy path to ground for the 1KHz signal, and a difficult path to ground for the 500Hz signal.
So lets imagine that our load resistor is 200Ohms (e.g the input impedance of the imaginary amplifier is 200Ohms)
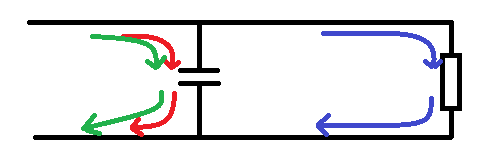
In the diagram below we see that the highest frequencies (red) pass through the capacitor to ground as this is the path of least resistance.
We also see the mid frequencies (green) pass to ground as 159Ohms is also less than 200.
But our 500Hz signals carry on and pass through the load.
Now lets put a 50Ohm resistor in there:
Now the total resistance of the path is the reactance plus 50
500Hz, Xc = 318Ohms + 50 = 368
1KHz, Xc = 159Ohms +50 = 209
2KHz, Xc = 80Ohms + 50 = 130
Now we see that the path through the load is the easier path for the mid (green signals) so they pass through to ground through the load along with the 500Hz signal. the 2KHz (red) signal is still grounded through the tone control.

Now for different playing styles we're going to want to be able to adjust the tone control such that we can choose what frequencies are going to be grounded, through the capacitor, and which ones we want to go through the load (amplifier).
We just figured out that by adding additional resistance to the capacitors reactance we can allow some frequencies to pass, whilst denying others, so basically what we're saying is that we want to use a variable resistor.
By using a variable resistor we can vary the total resistance to ground for the signals. turning the resistor up higher will add additional resistance to the capacitors reactance, making it more difficult for the higher frequencies to travel through the capacitor to ground, in turn making the signal sound brighter.
Turning the resistor down makes the path to ground easier. in turn stripping the brightness from the note and making it sound darker.

Values of capacitor
The values of capacitor make a huge difference to the sound. the 1uF capacitor used above can be see to strip away values of 2KHz and 1KHz so the sound getting through is only the really low values, if you put this sized capacitor onto a normal guitar (not bass guitar) the sound that you're going to get will be really muddy and low, you'll have stripped too much of the brightness out.
Also, because the value of the capacitor is so large, it's always going to have a smaller reactance than the input of an amplifier.
So what you really need to look for is a smaller value of capacitor.
You'll also want to choose your component values in accordance with the instrument that you;re dealing with.
For example Bass guitars are several octaves lower than a standard guitar, so you'll need a bigger cap value to take this into regard, there is no point putting a very small cap to reduce 10KHz signals on a bass guitar, because the instrument just doesn't produce these signals!
As seen above, the bigger the capacitor, the lower the frequencies that will pass through it to ground, and hence the darker the sound.
In general on an electric guitar you'll find the following values are good for the kind of tones that are described.
2200 - 6800pF will give a warm bright tone.
0.01 - 0.047uF will give a warm tone with a dark/blues/jazz edge to it
0.1uF and higher give a real dark sound, but remember if the capacitor value is too big that sound goes from dark, to muddy.
If you find that the sound that your guitar makes is too bright, then you should consider replacing the capacitor in the tone pot on your guitar for one that is a little bigger, experiment to find the right value to please your ears.
No comments:
Post a Comment